Show Posts

This section allows you to view all posts made by this member. Note that you can only see posts made in areas you currently have access to.


Messages - Daytona Z

Pages: 1 [2] 3 4 ... 8
16
Still cleaning things up here ahead of dropping the motor back into the car. This includes a lot of degreasing, some minor paint touch-ups, and remounting original things like the front rotors, calipers, brakes, steering, and suspension after having detailed much of it. Hoping to get the motor in on the weekend and will start buttoning it up again. New exhaust from Gardner will be the final touch on it.

Here are some random pictures taken during the past week or so.


17
Roger that, and thanks for the pics of the insp cover.

Finally caught up to some business dealings so now I should start making time for the car again. I installed the bell and painted one quick coat onto the motor so the colors would match. As per a couple of factory original motors I have seen over the years, I was less than careful when painting it and did hit the corners of the intake with a little overspray as the factory did. I finally got around to pulling the second valve cover off only to find it is the right #3932417 factory issued cover? So it now looks like the only one that was ever changed was the driver's side. Good news is I have found another pair and a single from eBay which is the correct side needed (so I guess I'll have spares)

I also had the original exhaust manifolds tumbled and hit those with some VHT high temp clear coat. Not sure how that will hold up once they get some use but time will tell. With most of the engine peripherals restored and ready to go, it should look pretty good when all is reassembled. I need to find some small original parts I have stashed around here and then things can start going back together. No rush with all the crap going on in the world today, but I'd like to have it out in a few weeks to get some seat time with the windows rolled down. Here are a few more pics to update the thread.


The original valve cover from the passenger side. I hadn't checked this one until now.


The part number is correct with 3932417 and drippers. I have one coming for the other side.


The passenger side head is dated H-26-9


Masked of some spare 68 Z covers I have and used them to block paint.


I made sure to hit the intake with a little overspray.


Same thing along the back where I hit the corners of the intake.


Exhaust manifolds are restored as are the original smog trees.


And here's the bell housing with the correct dog bone bolts securing it to the block.

18
Quote
When I find a nice original, I'll just fog it around the edges of the bolts and leave the rest black.
FWIW, the assembly line inspection covers were natural.

Now that you mention it, that brings back a bit of a foggy recollection on that. Good to know. Thanks  8)

19
Graeme, I noticed you have orange overspray on the clutch fork boot.  I think I read somewhere on this site that the boot was installed after engine / bell housing paint process.  I won't swear by it, maybe someone with more knowledge will chime in.  Great car and project BTW!

Yup. RSZMJT had told me about the fork boot going on after and that it was to stay black. The one pictured above is the one that came on this car and already had that skiff of paint on it. Likely from the engine builder who rebuilt the motor in 2015. It's a nice old original boot so I'll wipe the old overspray off of it and reuse it. The inspection cover is one that came to me with this 403 bell and it was also pointed out that it's the wrong design and has the oil pan tabs. It'll do until I can find an old original and Lloyd Costley also pointed out that it needs a little less paint next time around. I shot the whole thing and I'm learning now that it isn't correct. When I find a nice original, I'll just fog it around the edges of the bolts and leave the rest black.

As for paint colors, an old school engine builder & machinist who's done thousands of motors over the past 50 years told me there are 2 GM oranges and that the darker of the 2 belongs on the 68 and earlier blocks with the short water pumps. He uses the Duplicolor DE1607 for the darker orange and Duplicolor DE1620 on engine builds from 69 onwards with long water pumps. I don't know how accurate that claim is, but it's good enough for me as another builder I know uses the exact same 2 paints on his engine rebuilds too. Right or wrong, that's what I was told to go with so here are the paints of choice that I have been using for a while now. I'd suppose it's more of a personal preference as to what people use to paint their motors. I like the brighter color myself and I'm ok with either.

Bell housing has the lighter DE1620 while this block was painted by someone else and more closely matches the darker DE1607. I'll spray the motor with the lighter color before it goes back in the car next week. Just waiting on a couple of parts to arrive.


20
A few updates on the car being cleaned up and some parts being restored.

I finally scooped a set of late 69 3932417 covers today and will reskin them once they arrive. One was repaired but I also managed to scoop a single from eBay so all is good once they arrive. I recently installed a new flywheel and clutch onto the back of the 302 and just stripped painted a dated 403 bell housing the other day. Heading out to pair them up today and then the motor can soon go back in. Before it goes back in, the engine will also get a fresh coat of paint in the correct shade of GM orange. Whoever painted it last, painted it in the earlier shade of orange which is darker than it should be for 69. Today and tomorrow I'll do some more cleaning on the front frame horns before I start to reassemble the brakes now that the brake hardware is cleaned up and restored. Exhaust manifolds have also been cleaned up and tumbled so they are ready to now as well. Slowly progressing along here.


21
General Discussion / Re: HARMONIC BALANCER LARGE BOLT
« on: February 20, 2020, 01:45:39 PM »
Just seemed odd to me. Center bolt is drilled, but the other three were never drilled from the factory? Like it was being considered at one point, but later abandoned.

One of those things that makes you wonder what was or could have been?  :P

22
No, it was not along with everything else. Thankfully they left the driveshaft and the pinion yoke alone. The pinion appears to be a natural finish with what looks to be a blue inspection mark on the end of the pinion shaft. Straps are originals and have V stamping.


23
General Discussion / Re: HARMONIC BALANCER LARGE BOLT
« on: February 18, 2020, 02:03:20 PM »
Just out of curiosity, what did the center bolt wire across to as is the only bolt I see drilled out of the 4 on the lower pulley?

24
Restoration / Re: Brake Booster Paint Marks??
« on: February 18, 2020, 01:16:05 PM »
I just finished cleaning up the original booster in my car. It had some surface rust that I knocked off using a brass brush and some rust remover. As seen top center, it has the blue paint mark which is still intact. I was careful not to disturb the paint mark and will leave it as it as shown. Picture for reference.


25
For stripping any rust and/or spray paint from any of the brake lines, fuel lines or hard parts, I soaked them in evapo-rust which softened most of the spray paint and allowed me to wipe much of it off. Any stubborn spots were further stripped using a brass wire wheel on a drill. Delicate parts that I did not want to polish were done at slow speed, or they were cleaned by hand using rust remover and a small brass brush. This was true with the original master cylinder and the brake booster which each had some surface rust and required gentle cleaning. The diff is back in the car now, fuel line is done, and most of the brake lines are also done. I will finish off the master cylinder later this week and have some more cleaning to do on the subframe which will finish up in another week or two. Then the drive train can go back into the car. Ready well before spring is the plan here...then lots of driving and gear rowing. Z/28 style!


26
A few people have asked what I am using to cut the spray paint from everything that was painted. This included the floors, frame rails, engine bay, and the front & rear suspension areas. First off, it looked like a lot of this was enamel spray paint, and I don't think the previous owner or mechanic who painted everything did a very good job of the prep as some of it came off rather easily, and there was no undercoating except for inside the wheel wells. The paint removal product I researched and decided to use was Lloyd's Fight Back Graffiti remover. It's a biodegradable product that has claims of removing spray paint from multiple surfaces while not harming the original or underlying finish. I went by the application chart and directions on the side of the aerosol spray bomb and started with a small test area to ensure it did not hurt the original floor finish. Check!

Spraying in control bursts I applied the spray pattern to a small 12" x 12" area at a time and let it set up for 1 to 2 minutes. I then used a white (ultra-fine) and/or green (fine) Scotch Brite pad to work the area in either a directional or circular motion to move the spray paint around while it was being softened by the chemicals. I could see the chemicals softening the paint as I worked it and was careful to keep the work area wet where the chemical also became the lubricant for the pad. This also kept the strokes from being too aggressive. Just a light scuff with the pad was all that was needed to work through the softened spray paint while it was still wet. Getting the area wet and letting the product set up for 1-2 minutes was the key as it began to break down each layer of spray paint. It also served to soak and lubricate the Scotch Brite pad and this keeps the process from getting too aggressive or working beyond a single layer of paint at a time. Once it started to thicken or dry I would quickly rinse it down and wipe it off using clean cotton rags. The product calls for a water rinse to neutralize the chemicals. I tried that but it didn't serve well to remove the paint as it started to dry and it seemed to gum up and became tacky again. I switched to using brake clean from a commercial pump sprayer and this was far better at removing all contaminants in a simple swipe. 

I would then hit it with one more rinse using brake clean which cleaned each area very nicely. As a safety precaution, I would often open the overhead and shop man doors to air out the shop of any fumes as they build quickly. Concerned with shop safety, I also wore a full face (dual cartridge) respirator mask and good rubber gloves. I also made sure the furnace was off and any source of spark was eliminated prior to using any of these products. It would be better using these chemicals outdoors or in a better environment, but being that it's winter up here and temps are kind of cold, I was working in a heated 3 bay garage that I use for my personal workshop. In any case, you can see from the results here that this product is excellent to soften up and remove any spray paints from the original surfaces and produces excellent results. Not everyone is comfortable with brake clean for rinsing things down, but I thought it was better than many other solvent-based products and worked effectively for this project. Here's the link to a technical datasheet for Lloyd's product.

https://www.lloydslaboratories.com/wp-content/uploads/2015/08/Fight-Back-Graffiti-Remover.pdf


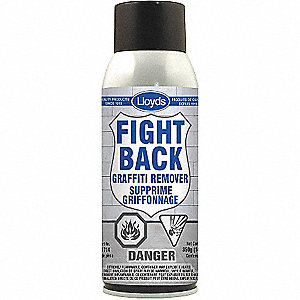
You can buy it in a spray bomb as seen above, or you can buy it in a bulk gallon container and dispense from a large pump-action spray bottle. Just be sure you wear gloves and eye protection. It claims to be a fairly safe chemical and is biodegradable but it states that the spray mist should not be inhaled. Again, I chose a mask to avoid breathing in any fumes or mist caused by the spray, and also wore a mask that integrates full eye protection. A must for working under the car and also while spraying brake cleaner. Better safe than sorry is what I like to practice. Here are a few pics that were taken while working around my shop. In the first shot, I am holding up two bottles of Lloyd's product while wearing a mask and gloves.


x

27
Here are a few pics of the original driveshaft in my 69 Camaro

1969
X77 Z/28
M-20
Norwood
Late Build Nov 69 - 10E
Clocked @ 30deg
Orange White Stripes @ 11" from tip
49-5/8" Length w/ Straps
BU 1028G1 (Strikeout C Prefix)


28
Yup,

Real clear on the 417 valve covers since learning those differences from you and a few others. Thanks for that. I've missed a couple of pairs on eBay but will snag a pair one of these days. Also looking for the AAC valve cover stand that supports the hose from the booster, and the fuel line clamp for the right rear. Got everything else dialing right in and have been busy perfecting a lot of the smaller things in this car. I think I'm 99.9% correct on factory bolts and correct head markings now.

Moving along nicely here now and should be finished up in 4-5 weeks time. Planning to have it out for spring thaw here in town.

29
Here are a few pics of the floors after cleaning them up. Still have a lot of the front to complete.


30
Floors are turning out really nice. I have most of them done now from the seats back including the tunnel. Car is up in the air today and I just put new filters on my full face mask and I don't smell anything at all? Keeps any drips out of my eyes as well. You can see me working in the engine bay in the fist shot, and the second one shows the mask I am using.


That be me inside the engine bay while cleaning.


I always wear a mask with chemicals and solvents in a confined space. Also, I open the door now and then to clear the room. No open flames or sparks either.

Pages: 1 [2] 3 4 ... 8