Show Posts

This section allows you to view all posts made by this member. Note that you can only see posts made in areas you currently have access to.


Messages - barsteel

Pages: 1 [2] 3 4 5
16
The for sure survivors I've looked at have had the master cylinder painted. According to the latest new addition NCRS 68/69judging manual it states the following: "The master cylinder was painted a low-gloss or foundry black. A semi-circular machined area at the front of the casting was machined after painting and so should be natural finish. The flat at the front has PG stamped in it for power brake units and DC for manual brake units." And "The boss that the brake lines thread into is machined flat after painting and will be natural finish." JohnZ has stated “I was there in the assembly plants in the 60's, and Delco-Moraine painted the master cylinders and brake calipers black prior to machining; I never saw one unpainted.”
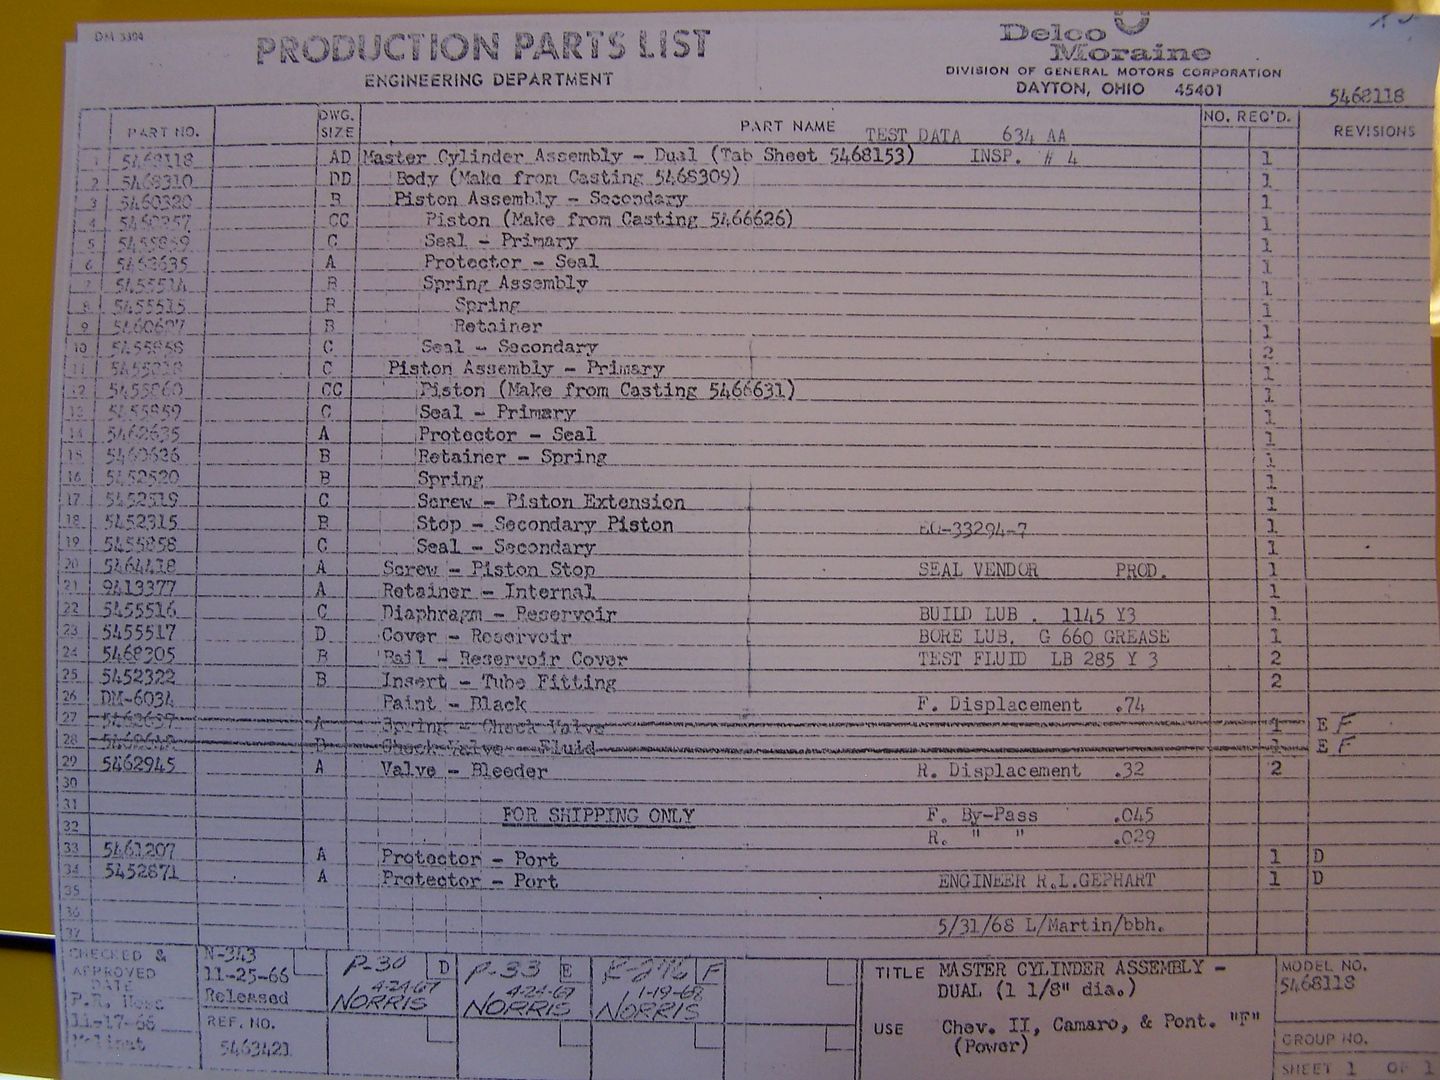
I purchased a late May69 power booster/master cylinder from Jere Stahl that had been given to him from Delco Moraine Engineering. On the production parts list sheet it calls for it to be painted black (see item 24).


Ok, now I'm a bit confused.  I ordered the MC and booster from Camaro Specialties (www.camaros.com), and their website, confirmed in a conversation with owner Bob, says that the '67 - '68 front power disc brake/rear drum MC should be coded "WT".

Is that the case?

Thanks...

Chris

17
X33, and everyone else -

Thanks for the additional input.  I've come to the same conclusion and done just as you've suggested.  I have an original, correct, dated coded booster, a correct MC, and all new hard and soft lines on order.

The calipers had been replaced a few years before I got the car, and they work perfectly, so I'm not that worried about them.  I've already replaced the rear wheel cylinders, shoes, and hardware, so I'm good on that front.

I just want to get the damn brakes working so I can enjoy the car for the fall.

Chris

18
General Discussion / New (but correct) MC - painted black, bare, or ?
« on: August 24, 2015, 07:42:14 PM »
Hello -

I've given up trying to solve the problem with my right rear brake locking up by going at it piecemeal.  Since I want the car to be as correct as possible, and most of the brake parts on the car should be replaced anyway, I bit the bullet and ordered a correct date coded booster and disc brake coded MC for my car, along with all the missing brackets for the prop. valve and splitter block, along with all new steel lines and hoses.

Question - how should the MC be prepped for a correct engine compartment?  Is it painted black, or left as a bare casting.  If it's bare, would painting it with cast iron paint be a no-no?  If it's painted, are the bleeders painted as well?  Anything else I should know?

I've heard that the booster should be left the original gold finish, so that's what I'm going to do, please correct me if I'm wrong.

Thanks...

Chris


19
Thanks for the input.  I just ordered the OEM steel lines.

Chris

20
Dug some more and answered my own question - www.camarocentral.com has them...

RSZ28, thanks for the reply...

Chris

21
Hello -

Getting ready to install the correct booster, MC, and proportioning valve/splitter brackets on my '68 Z28.

Does anyone make pre-bent stainless lines for between the MC and the proportioning valve and splitter block?

I've searched all of the usual suspects (Ricks, Year One, Classic Industries, Ebay), and I can't find any...

thanks...

Chris

22
Hello -

When Jerry looked at my '68 Z28, he remarked that I was missing the brackets that mounted the proportioning valve and line splitter block to the power brake booster.  Right now, they're just hanging in place by the brake lines.  I've since ordered the correct brackets from Rick's Camaros, but I'd like to see a pic of how they're supposed to be set up.

Also, I'd like to make sure that my lines are run correctly.  I've attached a pic of the setup I have now, although I already have the correct MC on order.

Forgive my ignorance, but on every brake system I've ever set up, I had the line for the rear brakes (the smaller, rear reservoir) feeding into the proportioning valve;  As I understand the valve's purpose, it is to restrict brake fluid flow the to rear brakes so as to prevent them from locking up before the front brakes.  Please excuse my ignorance if I'm wrong.

As the system is set up now, the front brake lines (large front reservoir) feed into the proportioning valve.  Is that correct?

Thanks in advance...

Chris

23
Update:

I checked the shoes and hardware, and everything was installed correctly.

I installed a new rear rubber line.  The old one appeared to be original;  If not original, then OLD.  After I got the new one installed, I tried to blow air through the old rubber line.  I blew till I was purple in the face and I barely got a hiss out of the other side, so it appears as if the hose was mostly plugged or collapsed.  I gravity bled the brakes and got a nice firm pedal.  I pumped the brake several times and checked the wheel movement, and it was fine.  No sign of a brake starting to hang.

All should have been well.

So I button everything up, hop in, and blast down the street.   After about a mile, I get that SAME telltale shimmy/shudder starting.  It's like one of the tires is badly out of round.  I start smelling the same burning smell as before.  I stop the car, and the pass side rear drum is starting to smoke.  The driver's side was getting hot, too.

One thing to note - although the pass side brake was getting hot, it did not appear to be as hot as it was previously.

So...I still have a brake problem.

My next thought is to replace the Master Cylinder.  As I'd mentioned before, I'd had the same brake problem with a hotrod '57 Chevy truck I had a few years ago.

Could the proportioning valve be bad?

Any additional thoughts?  I hate just throwing parts at a problem.

Thanks...

Chris

24
Bullitt -

When I redid the rears, I thoroughly cleaned and greased the adjusting wheel, so I sincerely doubt that that's it, but I appreciate the input.

It looks like the rubber hose is original, or at least very old, so that may be the next thing I look at...it's cheaper than a MC.

Keep it coming...

Thanks...

Chris

25
Hello!

I recently went through my '68 Z28 to get it ready for driving.  The rear brakes were shot, so I installed new shoes and wheel cylinders (old ones were leaking), and had the drums turned. I took the car for a short ride, and after about 10 minutes, the car started shuddering badly. I drove it slowly back to my shop, got out of the car, and saw smoke pouring out of the pass side rear wheel. I put the car on a lift, pulled the drum, and it appeared as I may have installed the parking brake hardware incorrectly. I straightened everything out, and took it for a ride. Same deal after 5 mins. Shuddering car, smoking pass side rear brake. Pulled the drum, and all appeared well except for the spring on the bottom of the shoes, the one over the adjuster. It appeared slightly bent. So I ordered a brake hardware kit from Napa, installed it, took it for a ride, and have the SAME DAMN PROBLEM, shuddering and a smoking pass side rear brake.

At this point I'm at somewhat of a loss. I've done more than a few GM drum brake jobs, and have never had a problem.

The shoes are installed correctly.  Short shoe facing the front of the car, long shoe facing the rear.

I'm thinking that it might be the MC.  I had a '57 Chevy 1/2 ton truck a few years ago that had sticking front brakes with a disc brake/under floor dual well MC conversion. Turns out that the truck had been sitting and rust had built up in the return port in the MC, so the fluid couldn't return.

I do know that this car was not driven a lot in the past few years, so the same thing might have happened.

What stumps me is why only 1 wheel is sticking.

The parking brake works corrects, and the car seems to roll freely with the brake off.

Anyone have any idea what could cause a drum brake to continue to stick?

Thanks...

Chris
Monroe, CT

26
Jerry MacNeish just left my shop.  Spent a few hours with him while he went through my '68 Z28.  Really nice guy.  Had an interesting conversation while he did his thing.

He said that it was "a nice survivor", with matching numbers on the engine, tranny, rear end, rims, carb, and distributor.  The booster, MC, fan clutch, radiator, and a few other pieces are not, all of which I knew.

I did all my homework before I bought the car, so I wasn't that worried, but it did eliminate any doubt at all as to the car's authenticity.  The car is not perfect by a long stretch, but it's solid, it runs, drives, and stops, so I can drive it as is for now.

Chris


27
Brian -

I did check the resistance from the sensor body to the block, and I got +/- 1 ohm, which I don't think would really throw anything off noticeably.

I have a new sending unit on order from Ricks.  I'll let everyone know what happens when I install it.

Chris

28
I did some reading and found a table for "typical" resistance for older GM sending units on a Corvette website.  It seems that at room temp, most of the sending units show between 570 and 650 ohms, and around 80 to 95 ohms at 212 degrees.

Going from memory, my sending unit put out about 750 - 800 ohms at room temp.  I just pulled it out and took it for a spin to get it up to full operating temp (which involved getting on it a few times...the sacrifices we make!), and put the ohm meter on the sending unit.  With the engine full hot, I got about 170 - 180 ohms resistance, which is far above what is listed as "typical" for the lowest resistance.

Based on the listed typical resistance values for the sending unit of 80 - 570, and for 55 - 225 ohms, the gauge should start registering around 130 degrees, and show half hot around 180 degrees.  Here's a link to the page with the resistance values.


http://www.lbfun.com/warehouse/tech_info/gauges%20&%20instruments/Temp-Sending-Unit-and-GaugeCF-Thread.pdf

It's looking more and more like I have a "going bad but not totally shot" sending unit.

Agree?  Disagree?

Chris

PS - ran a permanent ground to the temp gauge, and now it falls to full cold with the power off, and pegs at full hot when I ground the sending unit wire, so the gauge appears to be working fine.

29
Hello!

A few weeks ago, I was able to get my fuel gauge working with the help of some comments and pics from other users here.

Thank you.

Now I'm trying to get my temp gauge to work.  I found out the hard way that the fuel gauge was not working because the wiring was incorrect, so that may be the case for the temp gauge as well.  I've attached a pic, and I hope that someone can set me straight if the wiring is incorrect.

NOTE:  I've since added a ground to the bottom terminal of the gauge, as it appears that it should have a ground based on the pics I was able to find.  If the gauge is not grounded, it pegs full hot.

Here's what I've got...

Gauge is brand new from Rick's Camaros.

Their website states that the gauge is NOT internally resisted, so I need a shunt resistor, which I ordered from them and installed as well, as shown.

The sending unit is well grounded in the block.  Resistance between the brass body and the block is +/- 1 ohm.

The resistance for the sending unit itself is about 750 when cold.  I warmed the engine up somewhat and now it's reading about 160.  From what I understand, that range is correct for a factory sending unit, please correct me if I'm wrong.

Rick's website says that the gauge is rated for between 55 and 225 ohms(??!!!) - a range that does NOT match the sending unit ohms. 

With the gauge hooked up as shown, with the ground, the gauge will only go to less than 1/8 warm when I run the car for 15 minutes or so, which should be fully warmed up, or very close to it.

Can someone please:

1)  confirm that I have the gauge wired correctly
2) confirm the resistance range for the factory sending unit
3) Let me know if I'm missing something

Thanks...

Chris


30
Brian -

Thank you for the response.  My gauges don't have any module on them, so it was probably removed at some point for whatever reason.  I still have the yellow wire, so I will test the light by grounding it.

Does anyone make a replacement module?  I'm not concerned about the trip point, so an original type repro will work for me.

Thanks...

Chris

Pages: 1 [2] 3 4 5
anything