Show Posts

This section allows you to view all posts made by this member. Note that you can only see posts made in areas you currently have access to.


Messages - BlackoutSteve

Pages: 1 ... 23 24 [25] 26 27
361
Originality / Re: 1969 standard (non-RS) grill trim
« on: August 10, 2009, 07:43:48 PM »
Thanks.. :)
Wow, there's a lot of fussy, high dollar, concourse restos that overlooked that one.

362
Originality / Re: 1969 standard (non-RS) grill trim
« on: August 10, 2009, 11:20:25 AM »
All non-RS grilles arrived at the plant with the bright surround molding already installed; the plant masked off the molding and the portion of the grille inboard of the molding and painted the outer portion body color.

Hey John, was this on ALL silver grills? I see so many 69s with grills that are completely silver with no body color at all. Are they incorrect?
Thanks.

363
Originality / Re: Rear Window Defogger Ground.
« on: June 25, 2009, 10:47:20 AM »
Hey Rob!  :D

364
Originality / Re: Rear Window Defogger Ground.
« on: June 17, 2009, 11:40:54 AM »
Thanks Mark. :-* Thanks John.  :-*

365
Originality / Re: Rear Window Defogger Ground.
« on: June 16, 2009, 09:48:15 AM »
No, not yet.. I am assembling the car after a rostisserie resto, so a little while before I switch it on.
I just gave the defogger a new coat of paint and was concerned about it grounding. I thought maybe the fround was supposed to be via a screw to the body.. like the fuel tank's sender for example.
Thanks Mark.

366
Originality / Rear Window Defogger Ground.
« on: June 15, 2009, 11:46:14 AM »
I posted this over at Camaros.net, but unfortunately haven't received any responses.
Hopefully someone here can help me.
JohnZ, I understand you have an OE unit. A search brought up text, but none of the pictures you posted.


I have this rear window defogger for my 69..
This is how I received it when I bought it maybe 15 years ago.
It shows the ground strap fastened under one of the vent mounting screws.


Does anyone know if this is this correct? Reason I ask is because with the painted surfaces of the defogger housing and parcel shelf, the ground is very poor if any electrical connection at all to the body.

Unfortunately the AIM C50 chapter only shows the switch installation, and the Fisher Body Manual shows nothing. (I'm hoping I overlooked it somewhere.)

Going by clues of the type of serrated keps-nut (nut with integral star washer) that fastens the ground wire, which also has a serrated eyelet, I expect that these are incompatible with each other and the defogger should be positively grounded elsewhere. (or is that negatively grounded elswhere? ) I don't see the point of grounding to the housing of the defogger when it's not making a contact to the body.

367
Mild Modifications / Re: Cowl Induction with A/C
« on: June 29, 2008, 07:28:43 AM »
i actually have installed a cowl induction hood on my car.  My hope is to get it working the right way but not sure whether can make it work with the A/C suitcase in the way.

Mark.

There's nothing about an A/C car that interferes in any way with the ZL2 hood setup; it was available on SS cars with or without A/C.


I'm pretty sure GearheadTX is talking about the cowl induction ducting that went from aircleaner to cowl through the firewall in a 67. Not a using cowl hood.

368
Originality / Re: Drain Bolt Gasket
« on: June 28, 2008, 08:20:28 AM »
Why use copper versus nylon?

Nylon will conform to irregularities in the pan & bolt head with much less torque than that of copper. It's much softer.
I use the nylon washer/gasket as supplied in the felpro gasket kits, and they work just fine. No leaks!

369
Originality / Re: Under Hood Light For Cowl Hood - '69
« on: April 21, 2008, 07:44:16 PM »
Something that was brought up over at camaros.net, in the case of BB with ZL2, was the underhood lamp still mounted in the SB position as per "View C"?

370
General Discussion / Re: 69 cowl induction rarity
« on: March 09, 2008, 10:40:34 PM »
My GM hood purchased from Classic Industries in the mid '90s.
No numbers or letters.


371
Guys,

Getting them out as qucik as I can.  They are flying out of here...........singles and vendor orders too.  Rick's ordered 50 and sold them out in two days.  They just ordered 50 more today.  Shipped several hundred to other vendors last week too. 

Brandan, I did sign your book and mailed it today.  Will try to sign all that I get on the single orders. 

I do appreciate all of your support.

Thanks guys,

Jerry

Hey Jerry, what's the additional postage required for Australia? (USPS/Air please)
 ..and can I PayPal you?
Steve.

372
Originality / Re: 68 L78
« on: February 04, 2007, 11:29:40 AM »
No.
The correct PS pump mounting bracket is GM#3863146 as per the 1968 AIM (N40-A6). The rear adjustment brace is #3876788.
This is for all 396 engines. The L78 or N40 chapter shows nothing of a different PS bracket for the 396/375.
Just checking that the crank pulley for your L78 is #3869978.

What is the correct diameter balancer for the L78? 6-1/4", 7-1/4" or 8"? What's yours?

I did buy a repro PS bracket set for my 69 BBC and the fit was horrible! I had to bend it stightly to get it to line up, and the nut for the through-bolt was welded on out of square. Even the supplied through-bolt was an ungraded bolt with a metric head. (That went straight in the bin!) How disgusting! >:(
If yours is a repro, maybe it was made by the same cheap'n'nasty off shore company that made mine!

373
General Discussion / Re: XCO build numbers
« on: January 07, 2007, 07:45:27 AM »
Hey Bob.. Just got your email and thought that I too better pop-in and say hello!

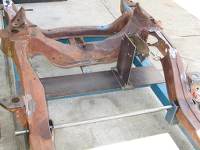
The lower pics in the above post are of my subframe conversion, and I am using a Saginaw 800 series box, also out of an Australian delivery Pontiac. It's an identical mirror copy of the LHD Saginaw boxes (God bless Saginaw! :P).

The problem that I can see with using a Holden or Ford Falcon box (which I hear is quite common) or any other, is where exactly to locate it. The Fore/aft, side, up/down and tilt angle can be a bit of guess work. You would want to hope that while the height of the Pitman arm is allowing the drag link to be at the correct height also, the steering column is still able to couple with it too. What is the height of the fitted Pitman arm in relation to the steering input shaft compared to the Saginaw?

With the Saginaw, once the centerline of the subframe is established, the LHD mounting holes are simply transfered across. A reasonable amount of fabrication is required if you want it to look right, but also because the rails are a 1/2" different distance from the chassis centerline. I also used a portion of Australian delvery Pontiac subframe from the formed piece that sits behind the steering box. The jig allowed a rigid foundation and a high level of accuracy in doing the conversion. The idler side was exactly the same process.


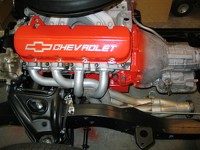
Using the RH Saginaw and mounting it that way, I have as much room as any normal LHD Camaro. I too have a big block and the headers aren't such a squeeze. Custom made is mandatory and as for manifolds, I'm not sure. Often LH & RH were different so, only one way to find that out!


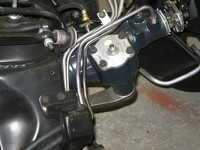
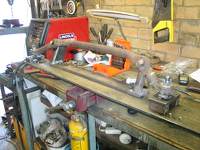
I also needed to make up a jig for the draglink. I didn't weld it though, I had Mr Blue (a qualified welder & chassis guru do it) and then had it Xrayed heat treated.. All that cost me $600 but..


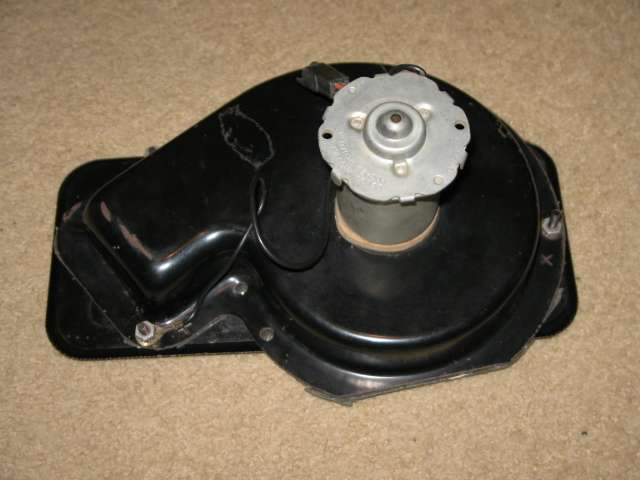
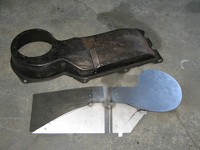
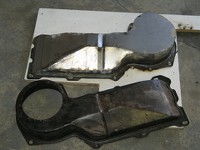
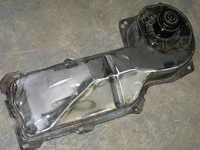
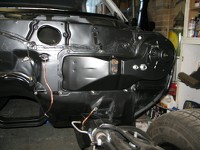
The heater box was a lot of fun. Lot's of work, nearly lost a finger!!, but the end result is very convincing.
There is a RHD fiberglass on available down here, but the finish and lack of detail was just not what I wanted. (Good value at $130 though.)


Any details you need to know, just ask me right here or email me. ;)

374
Originality / Re: "TR" head bolts
« on: August 27, 2006, 11:56:07 AM »
Intake manifold and water pump as far as I know.

375
Maintenance / Re: Sending Unit / Fuel Gauge Reading Problem.
« on: August 20, 2006, 10:55:59 PM »
Check all your electrical connctions first.
Maybe it's possible your ground is not as good as it could be or the sender's connection into the rear loom is not real great..

Pages: 1 ... 23 24 [25] 26 27
anything